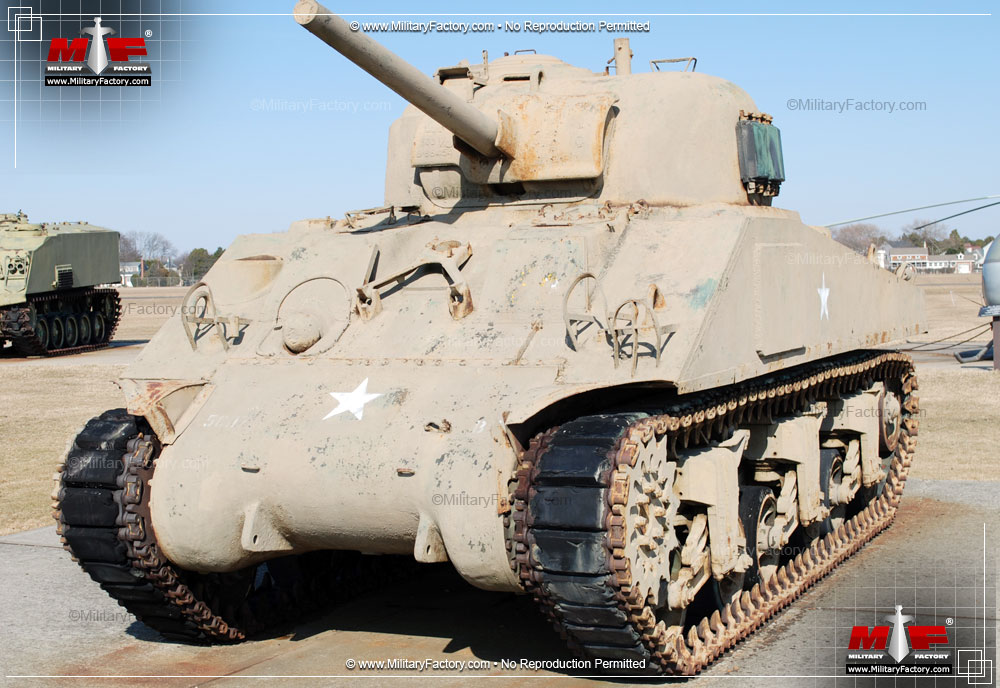
"The American M4 Sherman Medium Tank formed the backbone of the World War 2 Allied armored offensive and went on to see extended action in the following Korean War."
The M4 Sherman series of medium tanks proved an invaluable asset to Allied operations North Africa, Europe and the Pacific theaters of war in World War 2. The Sherman proved a relatively inexpensive, easy-to-maintain and - perhaps most importantly - an easy-to-produce combat system that more or less won the ground war for the Allies through sheer numbers. Similar to production efforts on the part of the Soviet Union with their T-34 tank system, the M4 Sherman was the same class of tank weapon under an American guise. Despite her reach, it was outclassed in the important combat-related categories when coming up against the later-stage German Panzer tanks. The M4 proved to be relatively weak in comparison to these German systems by its lack of a potent main gun and relatively inadequate armor protection for her crews and vital systems. If the Sherman had an advantage over her contemporaries, it was in her speed, battlefield reliability and simply her quantitative presence regarding in any given engagement of the day.
Europe Changes Everything
Events in Europe, following the German invasion of Poland on September 1st, 1939, necessitated a change to American tank design philosophy. To this point, America had put more emphasis on the development of light class tanks with only a smattering of resources going into medium tank development. The appearance of the German Panzerkampfwagen IV medium tanks running rampant across Polish defenses raised awareness on the part of the Americans, whose congress was still reluctant to release money to the military to upgrade their forces as Poland was, more or less, viewed as a less-than-capable military power of the time - the results were rather expected. However, that all changed once the French defenses suffered the same type of defeat. France was considered a major military power for the time and to see it dismantled by Germany's use of coordinated land and air power came as quite a shock across the world. Now with Paris under control of the Nazis, the US Congress had little reservations (or choice for that matter) in releasing millions of dollars in an effort to revamp the aged World War 1-era American armed forces.
The German Panzerkampfwagen IV (or simply Panzer IV) was originally intended as an infantry support tank. The presence of the mighty Soviet T-34 tank soon forced the Panzer IV to take on a "truer" tank-versus-tank battlefield role in which the Panzer could effectively engage the T-34's in head-to-head combat. The Panzer IV, therefore, was appropriately up-gunned and up-armored to meet this new Red challenge and went on to become the most produced tank in the German Panzer ranks. Such was the success of the Panzer IV that they were even fielded as late as the 1960's under the Syrian flag in the Six Day War - a true testament to the design's reach. The Panzer IV would go on to become the M4 Sherman's primary adversary across the North African and European fronts of World War 2.
The M3 Lee Medium Tank
The Americans designed the high-profile M3 Lee as an interim, this being based on the M2A1 Medium tank of which itself was an evolution of the M2 Light Tank. The M3 Lee was a serviceable tank system with very serious drawbacks in the way of off-road performance, a tall side profile and having her 75mm main gun mounted in a World War 1-style limited traverse "offset-right" sponson turret - the latter drawback limiting her ability to bring fire to bear on a target in time by forcing the entire tank system be turned to face the target. Though the M3 was limited in these factors, she was hardily available and her armor was sufficient. At the time, her 75mm armament finally gave the Allies a competent main gun for which to field against German armor in North Africa. She was first fielded by the British Army whom upheld their tradition of naming American-produced tanks after famous civil war generals (Robert E. Lee for the "M3 Lee" being the example here). The British were desperate to fill their dwindling supply of capable armor lost at the historical Evacuation at Dunkirk and in the grand desert campaigns of North Africa. The M3 would have to do for now.
M4 Origins
The new design was put into action beginning on August 31st, 1940. This medium tank would have to mount a 75mm main gun armament into a full-traverse turret. The new tank would also have to incorporate the engine, transmission, tracks and suspension systems of the M3 Lee medium tanks in an effort to ease production and save time. This new medium tank would also have to reduce the crew from six to five and feature improved armor allocation without increasing the vehicles overall weight (it was seen that the tank would have to be able to pass over the old bridges and roadways of Europe and Africa for it to stay relevant in any offensive movement). Design was to commence once the M3 series was out the door and was placed at the feet of the Aberdeen Proving Grounds.
The design appeared as the T6 pilot model and proved acceptable to US Army officials and production was ordered for the new "M4" on September 5th, 1941. Before production on the M4 ramped up, however, the M4 design was further revised to include a 12.7mm heavy-barrel Browning machine gun on the turret for anti-aircraft defense. A .30 caliber machine gun was then added to the upper hull bow plate. Though an additional paired 2 x .30 caliber bow-mounted, driver-operated machine guns were requested, these weapon systems were eventually dropped from the final production M4 form. Initial Shermans were produced as two different designated marks with the M4 sporting a welded hull and the M4A1 sporting a cast hull. By the end of the Sherman production years, construction of the tank would be handled by a variety of American heavy industry companies that included the American Locomotive Company, Baldwin Locomotive Works, Detroit Tank Arsenal, Lima Locomotive Works, Pressed Steel Car Company, Pacific Car and Foundry Company and the Pullman Standard Car Company.
First Appearances
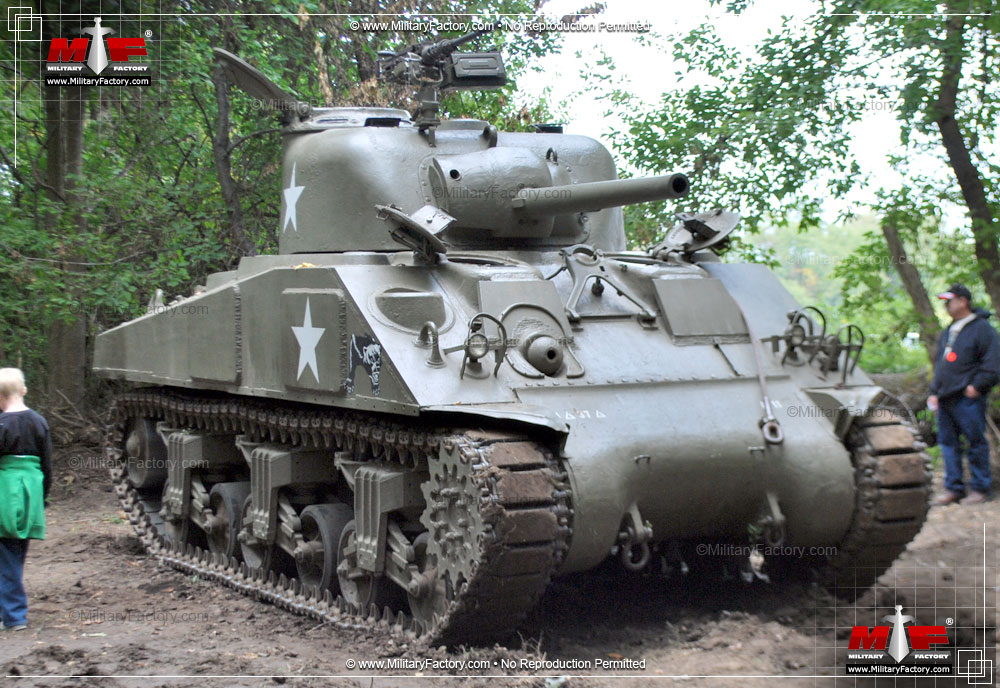
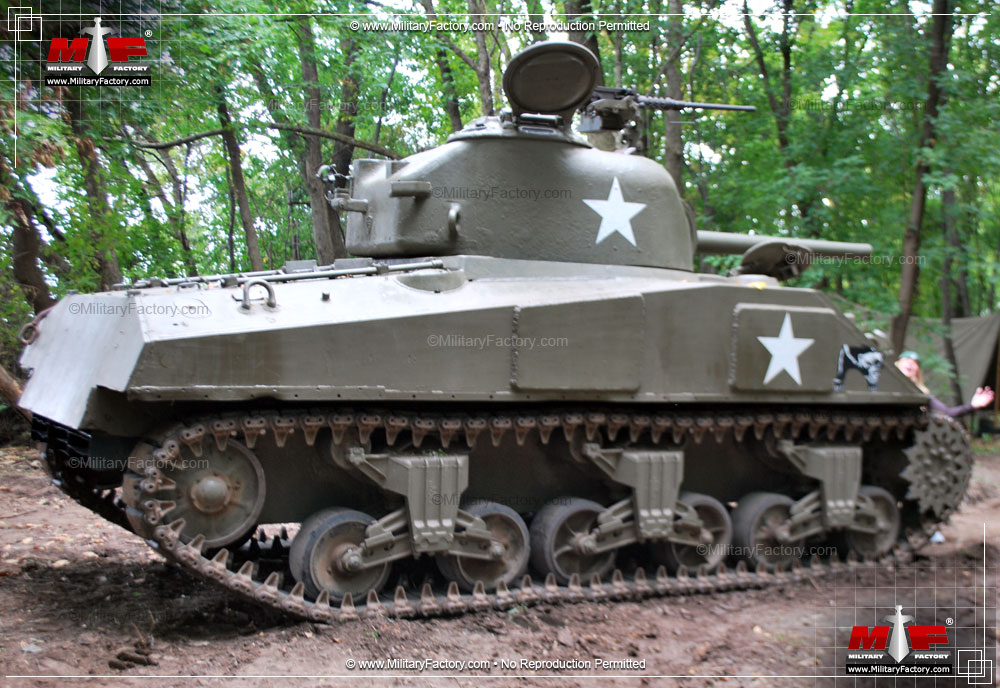
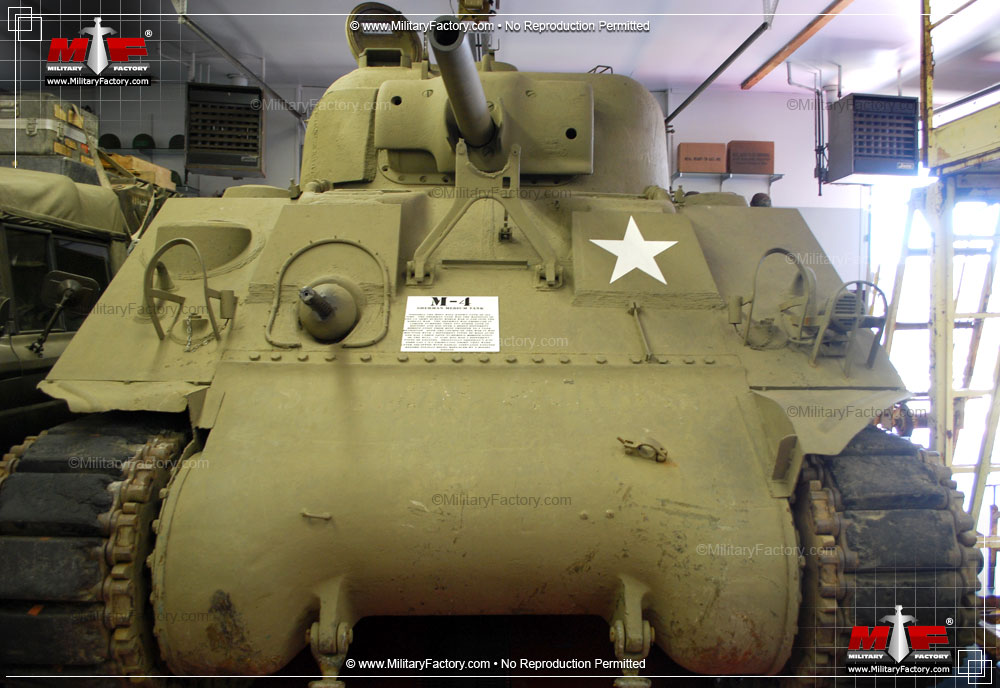
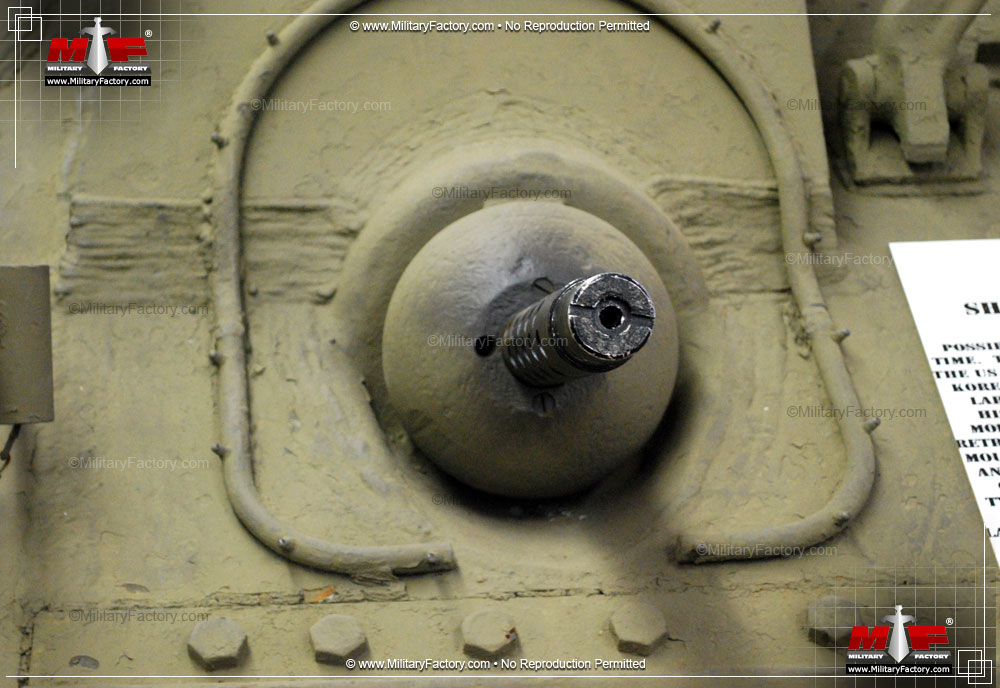
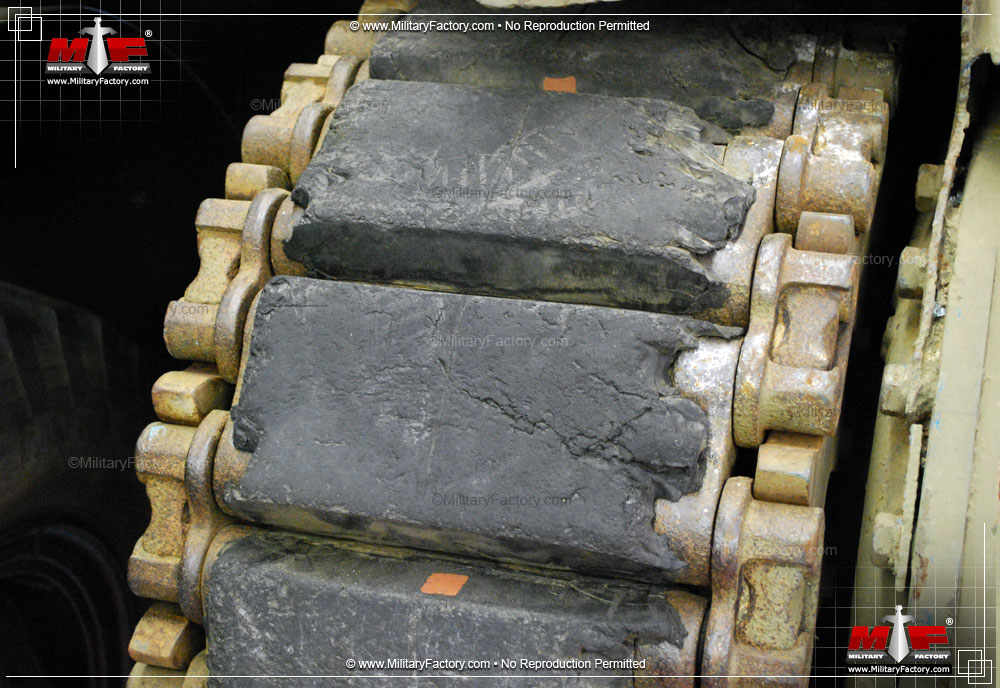
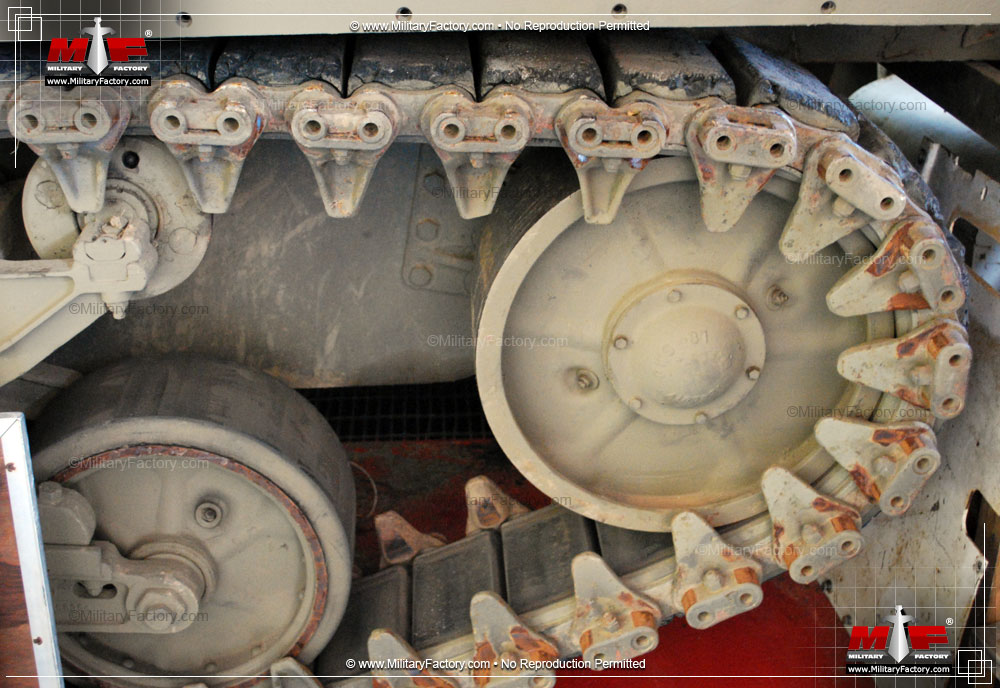
Like the M3 before it, external design of the M4 Sherman was characterized by its tall - albeit stout - profile. The Sherman was a large tank by any measure and featured an angled upper body fitted to an angled lower front hull. The most distinctive external marker for the M4 Sherman was her broad, sloped frontal hull armor with protruding position hatches for the driver and bow gunner. Wheels were similar to their original M2 design, sporting six road wheels to a side and fitted into three suspension bogies. The main gun (whatever the role was for a particular Sherman system) was fitted into a smooth and rounded turret encasement. Top hatches were provided for the driver, assistant driver and the tank commander (the latter's hatch in the turret while the loader received his own turret-mounted hatch in later Shermans). An emergency hatch was added to the hull floor just behind the bow gunner. Despite being shorter than her M3 sister, the M4 Sherman was still taller than her contemporaries like the Soviet T-34 and the German Panzerkampfwagen IV. Mounting the engine to the rear of the design was an accepted practice and continued to be so even on today's modern battlefield with the exception of the Israeli Merkava - this tank mounts her engine in the front, increasing the chance of crew survivability from a direct head-on hit. This design choice seemingly stemmed from Israel's previous - and multiple - armor campaigns against Arab nations leading to the assumption that Israeli tank engineers might know something the rest of the tank-designing world does not. The entire interior of the M4 Sherman series was painted in an overall white scheme.
The Sherman Crew
Crew accommodations amounted to five personnel (typical of the time in handling the various workloads aboard a conventional main battle tank) and consisted of the driver, the assistant driver/bow gunner, the ammunition loader, the gunner and the tank commander. The driver was situated at the forward left of the design. His position was dominated by two steering levers and floor pedals derectly ahead of his seat and an instrument panel situated to his immediate left. To his immediate right lay the transmission cover and a above that a storage shelf. The driver had free vision over to the bow gunners position to his far right and could visibly see the gunner, loader and commander behind him in the turret basket. The driver originally had access to a direct-vision slot but it was done away with in favor of a fixed periscope when the vision slots proved to be yet another ballistics weakness. The instrument panel contained basic performance gauges (speed, tachometer, oil pressure, fuel, etc.) as well as the starter switch, circuit breakers and two utility outlets.
The driver and bow gunner sat lower in the hull than the other occupants, this design decision once again being related to the downward angle taken by the propeller shaft running from the engine compartment at rear down into the gearbox at front. The gunner and loader sat on the turret basket floor in an elevated position when compared to the driver and bow gunner while the tank commander was seated still higher in the turret with quick access to his commander's hatch. A standing position could be attained by the tank commander via a flip-down circular seat for him to stand on. This allowed for the tank commander to rise up above his hatch and complete the ever-universal image we all have of a tank commander positioned chest-high out of his tank, assessing the battlefield before him.
The bow gunner doubled as the assistant driver though he had none of the driver controls allocated to his station. In the event that the primary driver would become incapacitated, the bow gunner could double in his place. The bow gunner's position required him to be seated at the right front of the hull where his station was primarily dominated by the tail end of his bow-mounted 7.62mm anti-infantry machine gun in a limited-traverse mounting. Like the driver, the bow-gunner was also given the use of a fixed periscope after the dropping of the direct vision slots mentioned earlier. The bow gunner's position proved useful in engaging and suppressing known enemy positions (as related to infantry) - an important component in the Sherman's arsenal when combating anti-tank gun crews. To prove the position more important, the bow gunner could also "mark" targets or help "range" the main gun onto a target (or suspected enemy location) via his machine gun tracer rounds which could be utilized to orient the gunner's cannon with. To the rear of the bow gunners seat was the floor-mounted emergency escape hatch fitted to allow the occupants of the Sherman an alternate, and somewhat safer, means of exiting the tank should the turret and twin top-mounted hull hatches be blocked or made impassable. Both forward positions (driver and co-driver) were given individual armored top-mounted hatches for direct entry and exit.
As exemplified in modern main battle tank systems, the bow gunner's position has been removed altogether, with self-defense handled by the gunner, loader or commander and their applicable machine guns while ranging is handled by complex laser ranging systems.
The gunner was afforded one of the most important jobs inside the Sherman in the firing of the main gun. By training order, the tank commander would verbally call out the target (signifying the target's type in the process), its location and what projectile to load. The loader processed the available information immediately and loaded the fresh ammunition round into the gun's breech. The gunners job was to traverse the turret in the desired location based on his commander's description and line up the target, adjusting for ammunition type and target distance. The gunner had the ability to rotate the turret at full speed and gradually decrease speed once he approached the targets general direction. Once lined up with the target, the gunner would affirm the commanders verbalized target parameters and take precise aim through his available scope. To complete the firing action, the gunner flipped the fire switch and depressed a foot pedal which activated the main guns firing solenoid, caused the main gun to ignite the propellant cartridge at the base of a given projectile munition and subsequently force the projectile out of the barrel and towards the target.
It can be surmised, the loaders job was to load the main gun. This was done by the loader pulling back on a lever located on the breechlock and then depositing a "fresh" projectile round - AP (Armor Piercing) or HEAT (High-Explosive Anti-Tank) - into the breech, depending on what type of targets were called out by the tank commander. Upon hearing the target call, the order was then given for which type of round the loader was to load. Most experienced loaders generally knew from past engagements what type of shell to load once the target type was called out. Generally, only the lead tank in any column was armed with a ready-round as this was done for safety purposes so the rear portion of the column would not accidentally open fire on the forward portion in the event of an ambush. This did well in keeping friendly tankers safe from one another, but in the heat of battle, it counted seconds against a tank crew's response time once the enemy had either opened fire or revealed themselves to the column.
The main gun loading action was set once the breechlock was closed and the firing pin automatically cocked. Upon receiving a physical signal - in the form of a nudge or kick - from the loader behind him, the gunner would then be free to fire the loaded projectile at will. The firing action recoil effect would then launch the spent shell casing out of the breech and onto the floor of the turret basket, leaving the breechlock open to receive the next round. This action was repeated by the loader and gunner as many times as needed under the direction of the tank commander. More often than not, gunners began to listen for the closing breech to signify the barrel was loaded and ready to go, not requiring a "go-ahead" from the loader - again, seconds were the difference between life and death on a World War 2 battlefield.
Despite US Army manuals dealing with verbal communications on how to handle the sighting, loading and firing actions in a Sherman, crews with enough experience together eventually learned to run things inside their tank through instincts and hand signals. Tank commanders still operated verbally for the sake of the entire crew but communications between loader and gunner could be made more efficient through the use of quick hand signals between the two. In a game of timing like that of a tank-versus-tank shootout, seconds count for everything in the survival of one's entire crew. It becomes easy to see how small-circle brotherhoods could evolve in such confined spaces where one man depends on the other to do his job to the fullest.
Notable Sherman Powerplants
Alongside their armament, the heart and soul of the Sherman lay in her selection of powerplants which themselves varied through production thanks to logistical shortages and performance limitations. The M4A3 fitted the Ford GAA. The Ford GAA was an 8-cylinder, liquid-cooled, gasoline-fueled engine with 450 horsepower at 2,600rpm that had its own origins as an aircraft engine. The engine itself was not well-liked by Sherman tank crews but serviceable nonetheless.
The M4A4 came online fitted with the Chrysler A57 "Multibank" gasoline-fueled engine. The Chrysler Multibank was named as such for it was essentially five commercial truck engines joined together in a "star" pattern. No doubt a system such as this proved to be a tank mechanic's worst nightmare. These engines proved the worst of the Sherman line and were therefore earmarked for export use and local state-side training of American tank crews.
Caterpillar offered a multi-fuel powerplant in diesel form from a revised Wright G200 air-cooled, gasoline system. The engine was retooled for diesel fuel use and became the Caterpillar D200A (later the Ordnance Engine RD-1820 series). These were limited production engines that were later dropped in favor of gasoline-fueled powerplants.
Exploding Engines
M4 Shermans earned a nasty reputation as exploding tanks after being directly hit, so much so that the tank earned the grim nicknames of "The Burning Grave", "Ronson" and "Tommycooker" ("The Burning Grave" was a term used by Polish tank crews while "Ronson' originated from a cigarette lighter of the time, one that would "light up the first time". Tommycooker was a British term for the Sherman based on a World War 1-era stove utilized in the trenches). Initially, this was associated with the engine catching fire (notably the gasoline-fueled types, forcing many-a-crew to distrust gasoline-fueled systems over the "more stable" diesel types) and ultimately exploding. Upon further review, it was found that the ammunition propellant charges were the true culprits of such interior explosions. The propellant charge had a natural tendency to violently react when hit by a flaming hot enemy projectile, resulting in an onboard ammunition explosion to the multiple available 75mm rounds. Some were so violent, in fact, that entire turret systems could be ripped clean off of their turret rings from such a result. As the worst fear of any tank crew was always (and continues to be) the idea of burning alive inside their tank, this proved to be a most unsettling characteristic of the Sherman production line, regardless of operating nationality. As a result, a revision in Sherman 75mm ammunition stowage practice did away with the twelve projectiles stored in the turret along with adding additional armor protection to those ammunition projectiles held in the side sponson storage racks. Later Shermans incorporated ammunition stowage under the turret basket floor and these could further be wrapped in containers for increased protection.
Ammunition Allocation
Ammunition storage varied in the M4 Sherman series as 75mm ammunition was organizationally strewn about the compartment. This included storage areas in the floor, turret and hull sponsons as well as a "ready" rack for quick access. 12.7mm ammunition was carried in the front right of the hull next to the assistant driver's position and along the turret floor. 7.62mm ammunition was stored at the assistant drivers position, in large supply behind the driver, along the tank floor and on the turret floor. Since crew-served weapons such as the M1 Thompson and (later) M3 Grease Guns were standard fare, .45 caliber machine gun ammunition was also stored in the turret. In addition to crew-served weapons, it was typical for a Sherman crew to carry a supply of twelve hand grenades for self-defense.
The 75mm Main Gun
The original Sherman 75mm main gun proved to be somewhat useless against a full-on frontal assault on later-generation German tanks. It proved all well and good against the Panzerkampfwagen III and early IV tanks in North Africa but the arrival of the Panzerkampfwagen V "Panther" and the Panzerkampfwagen VI "Tiger" soon changed its effectiveness. Many after-action reports describe incidences where multiple direct hits were placed on an enemy tank with no noticeable effects to the target, the Sherman's 75mm rounds seemingly "bouncing" off the Panzers. This led many of the Sherman tank crews to hold their mounts in suspect, believing their adversaries to have the better weapon on the battlefield. American General George S. Patton stood proudly by the design and encouraged his crews to open fire first using an AP (Armor Piercing round) to achieve first hit. This action was then to be followed by the use of a white phosphorous round smoke round. White phosphorous proved effective in igniting any residual oil or grease inherent on many of the German tank designs. The resulting fire was enough to force the Panzer crew to take action and - most likely - exit their vehicles rather than burn to death. It proved common practice on both sides of the conflict to machine gun any exiting enemy tank personnel. Better to have both tank and experienced crew out of the war indefinitely than to have the crew return tomorrow with a new tank ready to do the same to you.
Tactics in World War 2
As a result of their inherent inferior main armament, Sherman crews were also encouraged to engage their Panzer brethren at closer ranges and from the rear or flanks. In practice, this proved suicidal on many levels. Firstly, to achieve a flanking move on a Panzer required the Sherman to execute its obscenely long turning radius (Panzers enjoyed a much shorter turn radius). This was made further ineffective by the fact that Panzer tank tread systems allowed for one to move in opposite direction of the other, effectively allowing the tank to "turn in place", matching the movement of the flanking Sherman step by step. Secondly, the thought of bringing the Sherman in closer range to a German Panzer was not a happy one as German Panzers had the uncanny ability to decimate Allied tanks at any range with their potent primary armament.
The M4 Sherman In Action in World War 2
Like the M3, the British Army was the first Allied force to field the Sherman in anger, this occurring in the battles covering North Africa and, in particular, at the Second Battle of El Alamein of October 1942, fighting with the men of the British 8th Army. British M4 Shermans were known as "Sherman I's" while M4A1's were known as "Sherman II's". Ultimately, the British represented at least 80% of all Lend-Lease Sherman production (the Soviet Union received their fair share as well), mainly M4 and M4A1 models. Though under the British Commonwealth banner, Canada instead chose to manufacture their own version of the Sherman in the "Grizzly I Cruiser", a tank limited to just 188 production examples as the M4 Sherman became available in such great quantities. The Soviet Union became the other wartime user of the M4 Sherman via Lend-Lease.
First American use of the Sherman occurred in the November 1942 Operation Torch landings - the Allied invasion of North Africa - interestingly alongside their forerunning M3 Lee/Grant counterparts. Sherman deliveries by the hundreds would eventually force the M3's into secondary roles and ultimate disuse. The M4 and M4A1 represented early American M4 production models and these production models miraculously finished off the war despite being replaced in frontline service by the improved M4A3 models.
In Europe, anti-tank (AT) teams proved an equally worse fate for a surprising number of Shermans than German tanks themselves. As AT teams had the luxury of concealment and mobility, they proved tough pickings for Sherman crews forced to spot them through their small vision blocks. German AT weapons were ready for the task of defeating Shermans armor and ambushes were quite frequent and effective. From a logistical perspective, anti-tank weapons - be them either hand-held rocket launchers or crew-served mobile cannons - were simply cheaper to produce and easier to train personnel on - making their use on Allied tanks not much of a surprise. German AT teams were given the single-shot disposable Panzerfaust systems or the reusable Bazooka-inspired Panzerschrecks. Panzerfausts were so simple to use that they were issued in great quantity to Berlin residents before the Soviet invasion of the German capital at war's end. Panzerschrecks were simply larger copies of the American anti-tank Bazooka and equally feared as anti-tank systems among the Allied ranks.
In the Pacific, Shermans fared a bit better for Japanese anti-tank weapons were not on par with what the Germans were fielding in Europe. Besides anti-tank cannons (some German-inspired copies) and complex, high-power, anti-materiel rifles, the Japanese resorted to other anti-tank tricks including mines made from torpedoes and the like. When facing off against the Japanese Type 95 Ha-Go light tanks and Type 97 Chi-Ha medium tanks, the Sherman's 75mm main gun proved ever the effective measure against these uninspiring tank designs. Japanese tank design clearly lacked behind their naval and air implements from the outset of the war and never materialized once the war was in full swing. Sherman flamethrowing tanks also proved horrifically useful in "flushing out" stubborn Japanese infantrymen from their network of underground tunnels and fortress structures.
At any rate, Shermans proved susceptible to having their armor defeating in a myriad of ways. Pictures of embattled Shermans are common to find, with clean holes driven through their critical parts from enemy anti-tank weapons. Since heavier armored Shermans were not meant to be in any sort of quantitative amounts, Sherman crews developed field modifications to help ensure their survival. This came in the form of welding steel plates or the addition of sandbags or spare tracks to the front hulls in an effort to preemptively defeat incoming enemy projectiles before they were allowed to penetrate the armor surfaces of the Sherman. Though a Sherman's armor proved effective in early engagements, it was essentially designed against the top German anti-tank weapons of the time. Newer and heavier-caliber Axis anti-tank weapons and armament forced new Sherman survival tactics to be utilized. Furthermore, at least 20 percent of all Allied tanks lost in World War 2 came at the hands of land mines while the rest came from general tank-versus-tank and anti-tank combat actions.
Up Gunning the Sherman
By this time, the Sherman was already operating along all major front lines across the world. After action reports were forging the next Sherman version. The main gun issue was addressed with the accepting of a new 76.2mm main gun armament. A new suspension system and wider tracks greeted the new Shermans as did with a new commander's cupola featuring six vision blocks. A 360-degree periscope on the turret was another grateful addition to the turret crew. The driver and bow gunner hatches were also revised and feature a more integrated front facing without the protruding sharp angled faces of the original Sherman design. A new hatch above the loader was also added for improved emergency exiting of the vehicle. By the end of the war, nearly half of all operational production Shermans were sporting the more lethal 76mm main gun armament.
The Base Sherman at a Glance
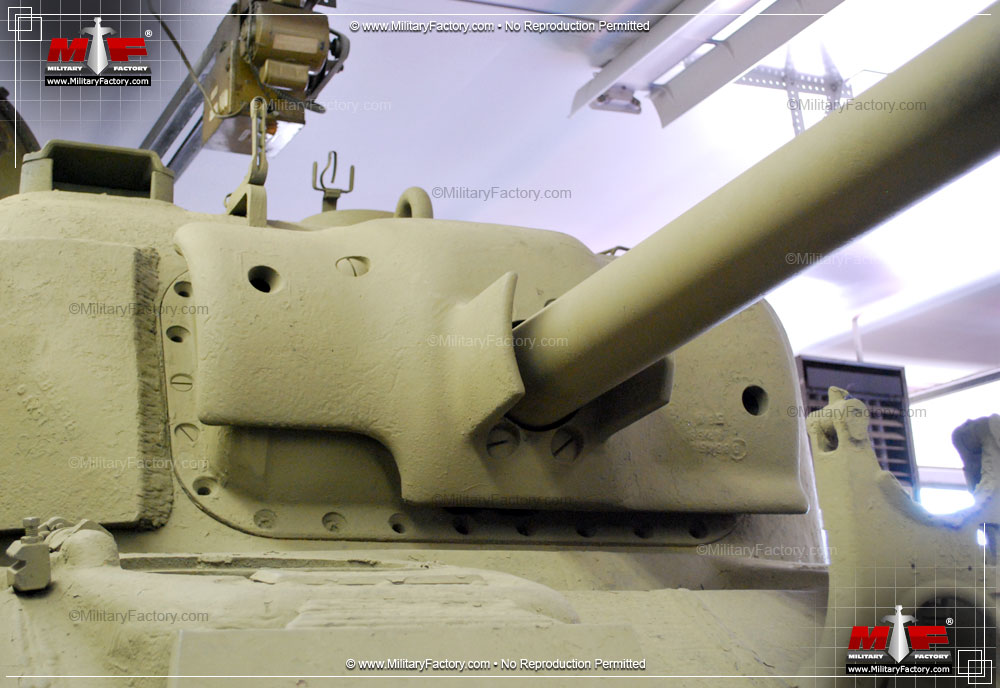
A standard Sherman model mounted the 75mm M3 L/40 main gun with 90 projectiles in tow. Anti-aircraft armament consisted of a heavy caliber 12.7mm Browning M2HB machine gun with 300 rounds. Anti-infantry defense constituted a .30-06 Browning M1919A4 machine gun in the bow and a similar machine gun mounted co-axially in the turret with the main gun. Power was supplied through the Continental R975 C1 gasoline engine which developed up to 400 horsepower when at 2,400rpm. The power-to-weight ratio was listed at 14 hp/tonne. Suspension was provided for via the Vertical Volute Spring Suspension (VVSS) system. Operational range was listed at 120 miles with a top speed of 25 miles per hour, achieved in bursts.
Numerous Sherman Variants
A broad run down of variants were available in the highly-produced Sherman series line. Among them were the M4 and M4A1 which inherited their exhaust systems and engines directly from the M3 Lee developments. The M4A1 also fit the 76mm main gun and saw first combat in this form in July of 1944.
The M4(105) sported a 105mm howitzer in place of the smaller caliber main gun and was powered by the Continental gasoline-fueled R975 radial piston engine and featured a welded hull. The M4 "Composite" Sherman was a 75mm-armed Sherman and a hybrid in terms of its construction. The tank featured a cast front hull but welded sides. Again, the powerplant was the Continental R975 gasoline engine. The M4A1(76)W fitted the improved 76.2mm main gun (US Army sources state it simply as the "76") and featured a cast hull with the Continental R975 radial gasoline engine. The M4A2 sported the familiar 75mm main gun, a welded hull and the General Motors GM 6046 2x6 diesel engine. The M4A3 were fitted with the Ford GAA V8 gasoline engines and 75mm armament. Only seven of the type were received by the British whom designated them as "Sherman IV's" and ended using them solely in testing roles. The M4A3W fitted the 75mm main gun with a welded hull and the Ford GAA V8 gasoline engine. This model was also the first Sherman to feature the Horizontal Volute Spring Suspension (HVSS) system along with wider tracks. The M4A4 was fitted with the 75mm main gun along with a lengthened welded hull. Power came from a Chrysler A57 5xL6 gasoline engine. These served primarily with British Army forces under the designation of "Sherman V". The M4A6 was another 75mm gun entry and featured the lengthened hull with a cast front hull and welded sides. Power stemmed from the Caterpillar D22A diesel radial piston engine.
The "Jumbo" Sherman
The M4A3E2 "Jumbo" were fitted with either 75mm or 76mm main gun armament. Welded hulls were the norm in this model as was the Ford GAA V8 gasoline engine. Armor was increased in this Sherman version and a new T23-styleturret was developed to accept the new main gun armament. Jumbo Shermans appeared in very limited numbers and were designed with the intention of use in the Normandy beach landings. However, the Jumbo did not enter service until August of 1944. In practice, the Jumbo Sherman proved to have thicker armor than her German Tiger I counterpart.
The "Easy-Eight" Sherman
The M4A3E8(76)W "Easy Eight" was similar in fitting a 76mm main gun, a welded hull and the Ford GAA V8 gasoline engine. The nickname "Easy Eight" was developed from its experimental "E8" designation. The Easy Eight became the first Sherman to sport the HVSS suspension system and saw combat in December of 1944. Easy Eights were kept online following the war in both 76mm and 105mm forms eventually seeing service in the upcoming Korean War.
The Sherman Firefly
The British went ahead with their own up-gunned Sherman and created the Sherman "Firefly" when their 17-pdr Cromwell tank model was delayed. Sherman Fireflies featured the Royal Ordnance QF 17-pounder gun of 76.2mm. It proved significantly better than the American main gun (with better penetration value than even the fabled German "88") and made for an effective British tank-killer. All British Shermans were eventually displaced by the Tank Cruiser Comet design and the stellar Centurion main battle tanks - the latter just on the horizon following the close of World War 2.
The Sherman Chassis and Its Various Implementations
The Sherman chassis was utilized in a myriad of other battlefield implementations. These included the popular Sherman Calliope - a basic Sherman tank with an overhead T34 rack fitting 60 x 4.5" battlefield rockets. Dozer attachments allowed the Sherman to act as a bulldozer and clear blocked roads of objects. Duplex Drives were developed to make Shermans "swim" along the water for use in amphibious assults. The R3 flamethrower created the Zippo flamer tanks. The M34 and M74 were converted Shermans for the armored recovery vehicle role. The M34 and M35 were artillery tractor mules. The M7B1, M12, M40 and M43 were all self-propelled artillery vehicles in the Sherman mold. Likewise, the M10 and M36 tank destroyers were purpose-designed killers stemming from the base Sherman design. The notable M7 "Priest" self-propelled artillery also utilizes the M4 chassis. Shermans also formed the basis of a series of mobile assault bridges and mine-clearers.
The Post-War Sherman
The Sherman remained in great numbers in the post-war years so much so, in fact, that the tank was readily available for use by the time of the Korean War. Use of the M4 was eventually relegated to second line duties as more and more potent war machines made their ways to the frontlines - the most notable of these being the M46 Patton, whose design stemmed from the World War 2-era M26 Pershing heavy tank.
Shermans in Korea
North Korea invaded South Korea on June 25th, 1950 and began the Korean War (1950-1953). The Soviet-designed T-34/85 main battle tanks (themselves originating from the successful wartime T-34's) were the primary armored units at the North's disposal. The United Nations, led by America, intervened on behalf of the South Korean government and people. The M4 Sherman was still available in large quantities at this time and therefore fielded en mass. The M4A3(76)W Shermans with their HVSS suspension systems were the primary mount of the US Army at the time. The United States Marine Corps utilized their 105mm-armed Shermans. United Nations armor was essentially made up of a mish-mash of new- and old-school tank systems.
Fighting against the North Korean army proved an intimate affair with close-quarter combat very likely in any given engagement. Tank crews found themselves fighting both tanks at range and North Korean infantrymen attempting to rush and penetrate the insides of Allied tanks by any means possible. Shermans eventually played their successful part in the grand campaigns that ultimately left the conflict in an armistice - though no affirmed peace treaty existed between the two sides. By the end of the war, armor superiority was firmly in the hands of the West. It is reported that 70 percent of all Allied tank losses in the conflict could be attribute to anti-tank mines rather than direct enemy anti-tank fire. By this time, the M4 Sherman's combat days in American service were all but over, paving the way for the much-improved M46 Patton followed by the still-improved M47 Patton.
Conclusion
Besides its involvement in World War 2 and the Korean War, the Sherman lived a long and productive combat life thanks to the other spate of global conflicts dotting the Cold War years. These included the Greek Civil War, the Arab-Israeli War, the Suez Crisis, the Indo-Pak Conflict of 1965, the Six Day War, the Indo-Pak Conflict of 1971 and the Yom Kipper War. Besides the United States and Great Britain, Israel represented the third major effective user of the type - an operator finding success with may post-American products through practice and never-ending combat experience.
Some 50,000 Sherman tanks are thought to have been produced, showing off her invaluable contribution to the World War 2 effort and the ensuing Cold War years. Beyond the United States, Britain, the Soviet Union and Israeli service, the Sherman was also utilized at one point or another by many world military forces including Brazil, France, India, Pakistan, Poland, Egypt and New Zealand (see operators section below for full listing). The Sherman was in United States service from 1942 through 1955.
Power & Performance Those special qualities that separate one land system design from another. Performance specifications presented assume optimal operating conditions for the M4 Sherman (Medium Tank, M4) Medium Tank.
1 x Continental R975 C1 9-cylinder gasoline-fueled engine developing 400 horsepower at 2,400rpm. Installed Power
24 mph 39 kph Road Speed
120 miles 193 km Range
Structure The physical qualities of the M4 Sherman (Medium Tank, M4) Medium Tank.
5 (MANNED) Crew
19.2 ft 5.84 meters O/A Length
8.6 ft 2.62 meters O/A Width
9.0 ft 2.74 meters O/A Height
62,611 lb 28,400 kg | 31.3 tons Weight
Armament & Ammunition Available supported armament, ammunition, and special-mission equipment featured in the design of the M4 Sherman (Medium Tank, M4) Medium Tank.
STANDARD:
1 x 75mm main gun.
1 x .50 caliber Browning M2 turret-mounted anti-aircraft machine gun.
1 x .30-06 caliber co-axial mounted machine gun.
1 x .30-06 caliber bow-mounted machine gun.
UPGUNNED SHERMAN:
1 x 76.2mm main gun OR 105mm main gun.
Other Sherman systems were fitted with 81mm smoke mortars (for screening) flamethrowers and 155mm howitzers.
AMMUNITION: 97 x 75mm projectiles.
300 x .50 caliber ammunition.
4,750 x .30-06 caliber ammunition.
Variants Notable series variants as part of the M4 Sherman (Medium Tank, M4) family line.
T6 - Pilot Model Designation by Aberdeen Proving Grounds.
M4 - 1 x 75mm main gun (some 105mm versions as well); welded hull (some with cast front and welded sides); gasoline Continental R975 radial engine.
M4(105) - M4 fitting a 105mm howitzer.
M4(105) HVSS - M4 fitting a 105mm howtizer; fitted with HVSS suspension system.
M4A1 - Continental radial engine; single-piece cast hull; 75mm OR 76mm armament.
M4A1E4 - Upgraded with 76mm M1 series gun.
M4A1(76)W - Upgraded with 76mm M1 series gun; cast hull; gasoline Continental R975 radial engine.
M4A1E8 - Widetrack HVSS suspension systems.
M4A1(76)W HVSS - Widetrack HVSS suspension systems; 76mm main gun.
M4A1E9 - Upgraded M4A1 models with 76mm main gun.
M4A2 - 1 x 75mm main gun OR 76mm main gun; welded hull; diesel GM 6046 2x6 engine.
M4A2E8 - Widetrack HVSS suspension systems.
M4A2(76)W HVSS - Widetrack HVSS suspension; 76mm M1 gun.
M4A3 - Fitted with Ford GAA V-8 gasoline engines; 75mm, 76mm or 105mm main guns; main US Army operational Sherman.
M4A3(75) - 75mm M3 main gun
M4A3(105) - 105mm M4 howitzer cannon
M4A3E2 "Jumbo Sherman" / "Cobra King" - Increased armor; revised turret angles; track-fitted Grousers; 75mm OR 76mm main guns; welded hull; Ford GAA V8 gasoline engines.
M4A3E4 - 76mm M1 main gun
M4A3(76)W - 76mm M1 main gun
E8 - Experimental Designation for ultimate M4A3E8 production model.
M4A3E8 "Easy Eight" - Widetrack with HVSS suspension system; 1 x 76mm M1 main gun; increased armor protection; welded hull; gasoline Ford GAA V8 engine.
M4A3(76)W HVSS - Widetrack with HVSS suspension system; 1 x 76mm M1 main gun; increased armor protection; welded hull; gasoline Ford GAA V8 engine.
M4A3E9 - Widetrack with HVSS suspension system; 1 x 105mm M4 howitzer cannon; gasoline Continental R975 radial engine.
M4A3(105) HVSS - Widetrack with HVSS suspension system; 1 x 105mm M4 howitzer cannon; gasoline Continental R975 radial engine.
M4A3W - 1 x75mm main gun; welded hull; gasoline Ford GAA V8 engine.
M4A4 - Fitted with Chrysler A57 Multibank engine; welded and lengthened hull; 1 x 75mm main gun; models becoming the Sherman "Firefly" tank destroyers mounting the QF 17-pounder main gun.
M4A5 - Reserved for Canadian Sherman production; never used.
M4A6 - 1 x 75mm main gun; cast front with welded sides lengthened hull; diesel Caterpillar D200A radial engine.
105mm Howitzer Motor Carriage M7B1 (M7 "Priest") - 105mm self-propelled howitzer based on the M4A3 Sherman chassis.
155mm Gun Motor Carriage M12 - 155mm self-propelled howitzer.
Cargo Carrier M30 - Based on M12 sans gun and ammunition storage.
155mm Gun Motor Carriage M40 - Self-propelled 155mm howitzer; based on M4A3 chassis with HVSS suspension
8in Howitzer Motor Carriage M43 - Self-propelled 8" howitzer.
3in Gun Motor Carriage M10 "Wolverine" - Tank Destroyer; based on M4A2 Sherman chassis.
3in Gun Motor Carriage M10A1 "Wolverine" - Tank Destroyer; based on M4A3 Sherman chassis.
90mm Gun Motor Carriage M36 "Jackson" - Tank Destroyer; based on M10A1.
90mm Gun Motor Carriage M36B1 - Tank Destroyer; based on M4A3 Sherman chassis and hull.
90mm Gun Motor Carriage M36B2 - Tank Destroyer; based on M10; diesel engine.
Tank Recovery Vehicle M32 - Fixed superstructure; sans turret; winch; 81mm smoke mortar.
Tank Recovery Vehicle M32B1 - M32 systems converted from M4A1 Shermans.
Tank Recovery Vehicle M32A1B1 - M32B1 systems fitted with HVSS suspension; later models nixing the 81mm mortar.
Tank Recovery Vehicle M32B2 - M32 systems converted from M4A2 Shermans.
Tank Recovery Vehicle M32B3 - M32 systems converted from M4A3 Shermans.
Tank Recovery Vehicle M32A1B3 - M32B3 brought to M32A1B1 standard.
Tank Recovery Vehicle M32B4 - M32 systems converted from M4A4 Shermans.
M74 Tank Recovery Vehicle - Based on M32 and converted from M4A3 Shermans with HVSS suspension systems; fitted with crane, tow winch, auxiliary winch and utility winch.
M74B1 - Similar to M74; converted from M32B3 systems.
M34 Prime Mover - M32B1 TRV systems converted to artillery tractor by Chester Tank Depot.
Sherman DD "Duplex Drive" - Amphibious M4 Sherman
M4 Mobile Assault Bridge
M4 Dozer - Fitted with dozer blade to front hull
T15 - Mine Resistant Sherman
E1 - Mine Resistant Sherman
E2 - Mine Resistant Sherman
Mine Exploder R1E1 Roller "Earthworm" - Armor-plated discs
Mine Exploder T1E2 Roller - Development Model; mine-clearer; twin forward 7-disc systems.
Mine Exploder T1E3 "Aunt Jemima" - Twin forward 5 x 10" discs
Mine Exploder M1 Roller "Aunt Jemima - Same as T1E3.
Mine Exploder T1E4 Roller - 16 discs in forward unit
Mine Exploder T1E5 Roller - Development Model; mine-clearer; based on T1E3 but with smaller wheels.
Mine Exploder T1E6 Roller - Development Model; mine-clearer; featured serrated discs
Mine Exploder T2 Flail "Sherman Crab I" - British-designed mine-clearer with forward-mounted flails.
Mine Exploder T3 Flail - Development Model; British-designed flail system; based on British-designed scorpion concept.
Mine Exploder T3E1 Flail - Development Model; based on T3; extended arm structures.
Mine Exploder T3E2 Flail - Development Model; based on T3E1; rotors replaced with large steel drum.
Mine Exploder T4 "Crab II" - British-designed mine flail.
Mine Exploder T7 - Development Model; smaller rollers with twin discs each.
Mine Exploder T8 "Johnny Walker" - Steel plunger system meant to stomp the forward ground area.
Mine Exploder T9 - 6-foot Rollers
Mine Exploder T9E1 - Based on T9; lightened weight.
Mine Exploder T10 - Development Model; remote-controlled mine-clearer.
Mine Exploder T11 - Development Model; fitted with six forward mortars.
Mine Exploder T12 - Development Model; fitted with 23 forward mortars.
Mine Exploder T14 - Development Model
Mine Excavator T4 - Development Model; fitted with standard straight plough.
Mine Excavator T5 - Based on T4; fitted with v-shaped plough instead.
Mine Excavator T5E1 - Based on T4; fitted with v-shaped plough instead.
Mine Excavator T5E2 - Based on T4; fitted with v-shaped plough instead.
Mine Excavator T5E3 - Based on T5E1 and T5E2; adjustable dozer.
Mine Excavator T6 - Based on T5; non-adjustable dozer
Mine Excavator T2 - Based on T4 and T5; adjustable dozer
Mine Excavator E1 - Based on T4 and T5; adjustable dozer
Mine Excavator E2 - Based on T4 and T5; adjustable dozer
Sherman "Firefly" - British conversion of M4 and M4A4 models as tank destroyers; 1 x Royal Ordnance QF 17-pounder main gun.
Rocket Launcher T34 "Calliope" - Rocket Artillery Vehicle; fitted with 60 x 4-6" rocket tubes.
Rocket Launcher T34E1 - Based on T34; fitted with 14 rocket tubes.
Rocket Launcher T34E2 - Based on T34; provision for launching 7.2" rockets.
Rocket Launcher T39 - Enclosed box mounting; 20 x 7.2" rockets.
Rocket Launcher T40 "WhizBang" - Fitted with 20 x 7.2" rockets.
M17 - Same as T40.
Rocket Launcher T72 - Based on T34 with shorter tubes; never produced.
Rocket Launcher T73 - Based on T40; 10 x firing tubes; never produced.
Rocket Launcher T76 - Development Model; rocket launcher; based on M4A1 Sherman; fitted with 7.2 rocket launcher; sans main gun.
Rocket Launcher T105 - Development Model; rocket launcher; based on M4A1 Sherman; rockets fired from enclosed case; sans main gun.
Multiple Rocket Launcher T99 - Development Model; twin enclosed box mounts fitting 22 x 4.5" rockets.
M4A3R3 Flame Thrower "Zippo" - Fitted with flame thrower.
Grizzly I Cruiser - Canadian-built Shermans; production by Montreal Locomotive Works.
Operators Global customers who have evaluated and/or operated the M4 Sherman (Medium Tank, M4). Nations are displayed by flag, each linked to their respective national land systems listing.
Total Production: 50,000 Units Contractor(s): American Locomotive / Detroit Tank Arsenal / Lima Locomotive / Pacific Car and Foundry (among others) - USA
[ Argentina; Austria; Bangladesh; Belgium; Brazil; Canada; Chile; China; Cuba; Denmark; Egypt; Ethiopia; France (Free France); Nazi Germany (captured); Greece; India; Iran; Iraq; Israel; Italy (post-war); Indonesia; Japan (post-war); Jordan; Laos; Lebanon; Malta; Mexico; Myanmar; Netherlands; New Zealand; Nicaragua; Norway; Oman; Pakistan; Paraguay; Peru; Philippines; Poland; Portugal; Saudi Arabia; Syria; South Africa; South Korea; Soviet Union (Lend-Lease); Sri Lanka; Taiwan; Turkey; Uganda; United Kingdom; United States; Vietnam; Yemen; Yugoslavia ]
1 / 10
Image copyright www.MilitaryFactory.com; No Reproduction Permitted.
2 / 10
Image copyright www.MilitaryFactory.com; No Reproduction Permitted.
3 / 10
Image copyright www.MilitaryFactory.com; No Reproduction Permitted.
4 / 10
Image copyright www.MilitaryFactory.com; No Reproduction Permitted.
5 / 10
Image copyright www.MilitaryFactory.com; No Reproduction Permitted.
6 / 10
Image copyright www.MilitaryFactory.com; No Reproduction Permitted.
7 / 10
Image copyright www.MilitaryFactory.com; No Reproduction Permitted.
8 / 10
Image copyright www.MilitaryFactory.com; No Reproduction Permitted.
9 / 10
Image copyright www.MilitaryFactory.com; No Reproduction Permitted.
10 / 10
Image copyright www.MilitaryFactory.com; No Reproduction Permitted.
The "Military Factory" name and MilitaryFactory.com logo are registered ® U.S. trademarks protected by all applicable domestic and international intellectual property laws. All written content, illustrations, and photography are unique to this website (unless where indicated) and not for reuse/reproduction in any form. Material presented throughout this website is for historical and entertainment value only and should not to be construed as usable for hardware restoration, maintenance, or general operation. We do not sell any of the items showcased on this site. Please direct all other inquiries to militaryfactory AT gmail.com. No A.I. was used in the generation of this content.