×
Aircraft / Aviation Vehicles & Artillery Small Arms Warships & Submarines Military Ranks Military Pay Scale (2024) Special Forces

Consolidated B-24 Liberator


Four-Engined Strategic Heavy Bomber Aircraft


United States | 1941


"The Consolidated B-24 Liberator heavy bomber was produced in greater numbers than any other American aircraft during World War 2."

Power & Performance
Those special qualities that separate one aircraft design from another. Performance specifications presented assume optimal operating conditions for the Consolidated B-24J Liberator Four-Engined Strategic Heavy Bomber Aircraft.
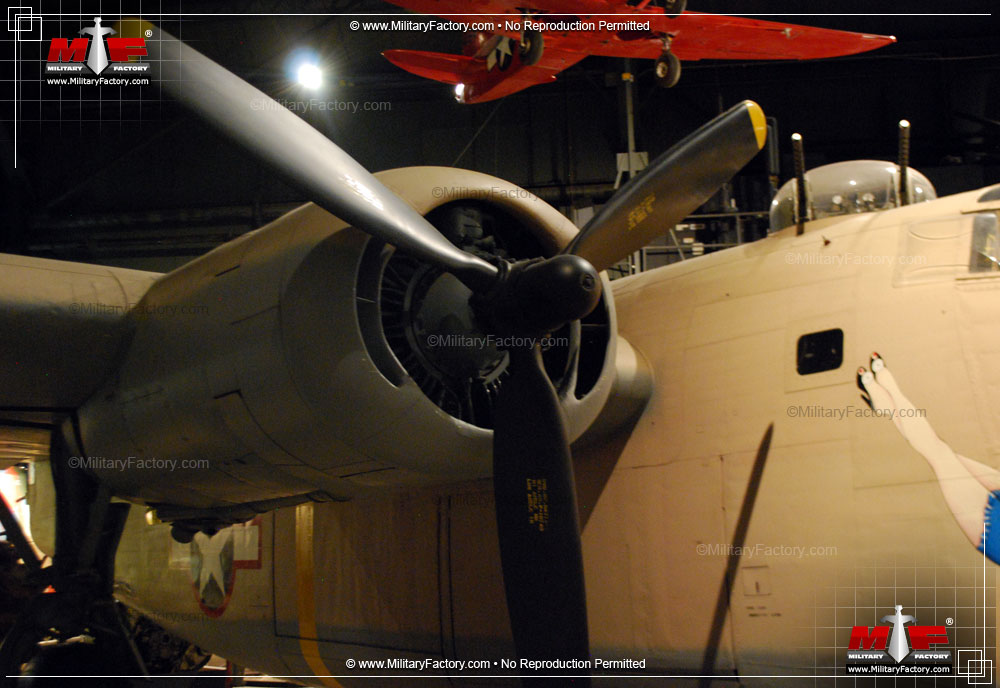
4 x Pratt & Whitney R-1830-65 radial piston engines developing 1,200 horsepower each driving three-bladed propeller units.
Propulsion
290 mph
467 kph | 252 kts
Max Speed
28,002 ft
8,535 m | 5 miles
Service Ceiling
2,001 miles
3,220 km | 1,739 nm
Operational Range
800 ft/min
244 m/min
Rate-of-Climb
Structure
The nose-to-tail, wingtip-to-wingtip physical qualities of the Consolidated B-24J Liberator Four-Engined Strategic Heavy Bomber Aircraft.
7 to 10
(MANNED)
Crew
67.2 ft
20.47 m
O/A Length
110.0 ft
(33.53 m)
O/A Width
18.0 ft
(5.49 m)
O/A Height
36,500 lb
(16,556 kg)
Empty Weight
65,001 lb
(29,484 kg)
MTOW
Armament
Available supported armament and special-mission equipment featured in the design of the Consolidated B-24 Liberator Four-Engined Strategic Heavy Bomber Aircraft .
B-24D:
2 x 12.7mm machine guns in nose turret.
2 x 12.7mm machine guns in tail turret.
2 x 12.7mm machine guns in dorsal turret.
2 x 12.7mm machine guns in ventral ball turret.
1 x 12.7mm machine gun in left-waist fuselage position.
1 x 12.7mm machine gun in right-waist fuselage position.

Up to 8,800lb of internal-held conventional drop bombs.
Variants
Notable series variants as part of the Consolidated B-24 Liberator family line.
Model 31 - Flying Boat proposal for USN utilizing Davis Wing later used on B-24.
Model 32 - Consolidated company designation
XB-24 - Prototype Model Designation; single example produced; fitted with Pratt & Whitney R-1830-33 radial piston engines of 1,000 horsepower.
YB-24 - Preproduction Models
B-24 - Service Test XB-24 Model; deleted leading edge slots; de-icing boots; 7 examples.
B-24A - Initial Production Model; 30 examples.
XB-24B - Fitted with R-1830-41 turbo-supercharged radial piston engines of 1,200 horsepower each; improved top speed; revised engine cowlings; singe example converted from the XB-24.
B-24C - Converted from B-24A; revised engine cowlings; Emerson A-6 power turret in tail with 2 x 12.7mm machine guns; Martin power turret in nose.
B-24D - First quantitative production model; fitted with Pratt & Whitney R-1830-43 supercharged engines; ventral gun station replaced with Bendix turret then Sperry ball turret; later models sported cheek machine guns for improved forward defense; 2,696 examples produced.
B-24E - Development of the D-model with production held by Ford Motor Company; fitted with Pratt & Whitney R-1830-65 radial piston engines; ventral gun station of early models; 801 examples produced.
XB-24F - B-24D Conversion Prototype Model to test de-icers.
B-24G - Production by North American Aviation; fitted with 3 x 12.7mm machine guns in nose; Sperry ball turret in ventral position; 405 examples produced.
B-24G-1 - Production by North American Aviation; based on B-24H; fitted with Emerson A-6 nose turret replacing earlier machine gun arrangement.
B-24H - Ford Motor Company development; fitted with Emerson A-6 turret in nose; revised airframe and bombardier compartment; revised vision from tail turret and dorsal turret; staggered waist gunners; 3,100 examples produced.
B-24J - Based on B-24H model sans armament arrangement; improved autopilot and bombsight; 6,678 examples produced.
XB-24K - Development of Ford Motor Company; B-23 Dragon empennage fused to B-24D airframe; single example converted as such.
B-24L - Lightened attempt; sans ball turret; 2 x 12.7mm machine gun arrangement in ventral gun position; M-6A turret in tail; 1,667 examples produced.
B-24M - Based on the B-24L lightning effort; lightened A-6B tail turret; uncovered waist gunner ports; revised windshield; 2,593 examples produced; last production B-24s.
XB-24N - Based on the B-24J; fitting single vertical fin tail and revised nose and tail turrets; ordered but never produced; single example.
YB-24N - Pre-production Model of XB-24N single-tail Liberator; 7 examples produced.
XB-24P - Based on the B-24D; used as test aircraft for Sperry Company; single conversion example.
XB-24Q - B-24L conversion model handled by General Electric; radar-controlled tail turret.
XB-41 - Liberator modified as a gunship for bomber escort duty; 14 x 12.7mm machine guns; bomb bay held 11,000 rounds of 12.7mm ammunition; poor performance specs forced project to be dropped' single example converted from B-24D model.
C-87 - Engineer Trainer
C-87 "Liberator Express" - 20-seat passenger transport
C-87A - VIP transport with seating for 16; fitted with Pratt & Whitney R-1830-43 or R-1830-45 series engines.
C-87B - Proposed armed passenger transport; dorsal and ventral turrets; machine guns.
C-87C - RY-3 re-designated by USAAF
RB-24L - B-29 gunnery trainer with remote turrets
TB-24L - Similar to RB-24L but with added radar equipment.
XC-109 - Prototype Tanker
C-109 - Production Tanker
XF-7 - B-24D model converted as prototype photographic reconnaissance platform.
F-7 - B-24H model converted to photographic reconnaissance platform.
F-7A - B-24J model converted to three-camera photographic reconnaissance platform.
F-7B - B-24J model converted to six-camera photographic reconnaissance platform.
BQ-8 - B-24D and B-24J models converted as radio-controlled flying bombs.
PB4Y-1 - USN designation of B-24D, G, J, L and M production models; revised nose turret.
PB4Y-1P - Photographic Reconnaissance Version of PB4Y-1.
PB4Y-2 Privateer - Single Tail Liberator Model
P5Y - Proposed PB4Y-1 with only two engines
RY-1 - USN designation of C-87A transport
RY-2 - USN designation of C-87 transport
RY-3 - USN transport version based on the PB4Y-2 Privateer.
LB-30 - USSAF armed transports built from British B.Mk II models.
LB-30A - French pre-production models; re-routed to England after fall of France via Lend-Lease; 6 examples.
LB-30B - British Lend-Lease Models of the B-24A; 20 examples (B.Mk I).
Liberator B.Mk I - British B-24A models; 20 examples delivered.
Liberator GR.1 - B.Mk I models rebuilt as anti-submarine patrol platforms.
Liberator B.Mk II - Similar to B-24C models; fitted with British equipment and armament.
Liberator B.Mk III - Based on B-24D; single 7.7mm machine gun in nose; Boulton Paul tail turret with 4 x 7.7mm machine guns; 1 x 7.7mm machine gun to each waist position; 2 x machine guns in dorsal turret.
Liberator B.Mk IIIA - Same as B.Mk III but with American armament and equipment.
Liberator B.Mk IV - Not Used
Liberator B.Mk V - B-24D model with expanded fuel capacity and less armor protection; armament suite of B.Mk III models.
Liberator B.Mk VI - B024H models; Boulton Paul turrets.
Liberator B.Mk VIII - B-24J models
Liberator GR.Mk V - RAF Coastal Command B-24D models; anti-submarine variants with searchlight and radar; optional rockets.
Liberator GR.Mk VI - B-24G, H and J models for RAF Coastal Command; reconnaissance platforms.
Liberator GR.Mk VIII - RAF Coastal Command B-24J models for anti-submarine patrol.
Liberator C.Mk VI - Transport conversion models of the B.Mk VIII.
Liberator C.Mk VII - C-87 designation
Liberator C.Mk VIII - Transport conversion models of G.Mk VIII models.
Liberator C.Mk IX - RY-3 transport designation
Authored By: Staff Writer | Last Edited: 07/22/2021 | Content ©www.MilitaryFactory.com | The following text is exclusive to this site; No A.I. was used in the generation of this content.

The Consolidated B-24 Liberator became a major player for Allied forces during World War 2. Its exploits ranged the world over - as did her users- and she saw action in a variety of roles in all major theaters. Designed to overtake the mythical Boeing B-17 Flying Fortress and appearing as a more modern design in 1941, the Liberator fell short of this goal but instead operated side-by-side with her contemporary to form a powerful hammer in the hand of the Allied bombing effort. Though the B-17 ultimately proved the favorable mount of airmen and strategic personnel, one cannot doubt her impact in the various roles she was assigned to play in. The Liberator went on to become the most produced American aircraft of the entire war.

Development

The United States Army Air Corps (USAAC) issued a new specification in 1935. This specification required the development of a new multi-engined, long-range heavy bomber capable of exceeding a top speed of 300 miles per hour, besting a range of 3,000 miles, maintaining a service ceiling of at least 35,000 feet and taking on an internal bombload minimum of 8,000lbs. Production of the Boeing B-17 Flying Fortress was well underway and, in 1938, Consolidated was requested to help in its production. As part of the production initiative, Consolidated executives were brought to Boeing's plant in Seattle, Washington to visit the factory. It was this meeting that prompted Consolidated to submit their own heavy bomber design with a more modern flair. The USAAC granted Consolidated a design study in January of 1939 under C-212 with the intent that this new aircraft exceed the performance specifications (speed, range and ceiling) of the B-17 and be ready in time for production before the end of the war.

Consolidated wasted no time in developing their design - the Model 32 - and brought about a few revolutionary changes in the approach of American bomber designs. Model 32 sported a tricycle undercarriage - the first American bomber to do so - doing away with the traditional "tail-dragging" design as utilized by the B-17. The monoplane wings were also held in a high shoulder-mounted position, themselves made wide and holding two engines to each wing leading edge in underslung nacelles. The high wings were of less surface area but promoted a higher fuel efficiency standard than the low-mounted assemblies on a B-17. Of note here was Consolidated's Model 31 (XP4Y Corregidor) foray which utilized the same "Davis" high aspect wing (or "Davis Wing"). This aircraft was of a twin-engine sort and designed as a flying boat. Ultimately, the design fell by the wayside when an order for 200 examples was cancelled by the United States Navy due to program delays and a lack of available Wright engines.

The Davis Wing emerged from the mind of David R. Davis, an aeronautical engineer working on a new wing planform, a planform utilizing a short chord and high aspect ratio along with thickness suitable to fit engines and fuel while maintaining efficiency. His meeting in the summer of 1937 with Consolidated President Reuben H. Fleet allowed the wing design to flourish as one of the most utilized wing planforms of World War 2. The new wing was intended for use on the company's new flying boat design - the Model 31. Despite the Model 31's cancellation (only one example emerged from development), the wing was seen as a good step forward in the design of the upcoming B-24 Liberator and became a major Consolidated design mainstay thereafter.

Other features of the Model 32 included the selection of 14-cylinder Pratt & Whitney R-1830 radial piston engines, deep bomb bay fuselage and a twin vertical fin tail assembly. The development process culminated in an offered contract on March 30th, 1939, for a flyable prototype under the designation of XB-24. The XB-24 was made available and achieved first flight on December 29th, 1939, from Lindberg Field in California with 4 x Pratt & Whitney R-1830-33 radial piston engines of 1,000 horsepower each. The aircraft failed to reach the projected top speed of the original design intentions but, overall, the first flight was a success. To help iron out the prototype design, a further six YB-24/LB-30A evaluation/pre-production models were ordered, built and delivered. These were followed by the B-24, seven examples of which only one was used for service testing. The B-24 featured de-icing boots and deleted the leading edge slots of previous forms.

Orders were beginning to pile up for the new Consolidated design, an amazing feat considering these were being received before the XB-24 had yet to fly. Production began at Consolidated's San Diego plant of which the first six systems were earmarked for the French Air Force as LB-30A models. With the fall of France in 1940, these aircraft made it to British Royal Air Force hands via Lend-Lease. The RAF found their early production forms to be unsuitable for the rigors of combat for they were not even fitted with self-sealing fuel tanks - a valuable characteristic of all military aircraft by the end of the war - and relegated them to ferry type duties. The USAAC called for 36 of the aircraft while the British ordered 164 for the RAF. Upon reception of the aircraft, the British bestowed the name of "Liberator" and the legacy of this multi-engined bomber was now born. Like other British-named American goods (the M3 Lee/Grant medium tank for example), the United States military accepted the British name of Liberator as part of the official designation from then on. First production models became the B-24A/LB-30B.

The XB-24B was designed to exceed the projected top speed of the XB-24. This included replacing the original Pratt & Whitney radials with turbo-supercharged versions in the R-1830-41 of 1,200 horsepower each. The XB-24 prototype served as the conversion model, which now gained a top speed increase equal to 37 miles per hour. The new engines and their turbo-superchargers also forced a revision of the engine cowlings. The XB-24B went on to become the first definitive operational Liberator forms in service with Britain and the United States. Early definitive and quantitative models in general became the B-24D, B-24E and the B-24G.

Walk Around

Liberators were crewed (depending on the model) by 7 to 10 personnel. The pilot and co-pilot were situated in the high-mounted stepped flight deck with views forward, to the sides and above. Of the two seats in the cockpit, the pilot occupied the left hand seat while the co-pilot sat to his right. The pilot was essentially the overlord of the Liberator and ultimately held responsible for the actions and relative well-being of the rest of his crew. The pilot maintained the Liberator's position in flight and was called upon to deliver the aircraft to the target area and back or make split-second decisions based on actions to keep his crew alive. The co-pilot was equally trained in the systems afforded the pilot and was, for all intents and purposes, the pilots right-hand man. He participated in the operation and controls of the Liberator to help alleviate the responsibilities of the pilot. Like the pilot, the co-pilot could be called upon to fully operate the aircraft to and from the target area and, like the navigator, was skillfully trained in the fine art of navigation.

The nose gunner, bomber and navigator were housed under a glazed nose well forward in the design. The nose gunner was perhaps afforded the most stunning (and oft-targeted) position in the Liberator, watching every bombing mission unfold like no other crewman. The nose gunner had access to the powered nose turret if the model of Liberator called for one, fitting 2 x 12.7mm machine guns. Since the front of the Liberator was most susceptible to incoming enemy fighters, this position was also one of the more dangerous on the aircraft.

The bombardier held the most important job in the flight crew. For the Liberator's were designed with bombing in mind, a flight crew without a trained bomber crewmember was ultimately useless in the Allied air campaign. Bombardiers and pilots shared a common role for the bombardier would be called on to take flight control of the bomber when engaging in the bombing run via auto-pilot. Calculations were necessary to unleash payloads directly over target areas, thus requiring bombardiers to maintain a certain level of mettle while blocking out enemy fighters, flak, structural damage or personal combat wounds. Lead bombers were also the elements that triggered the rest of the formation to drop their bombs. Later advances in airborne technologies allowed bombardiers to achieve direct hits even through cloud and smoke coverage.

The navigator was given the important responsibility of getting the crew to the target and back home. This was particularly important of the lead bomber in a given flight group but all navigators needed exceptional know-how of their position to lead a bomber through should the aircraft become displaced from his group. The navigator could utilize the forward-mounted Plexiglas dome to get his bearings as well as relying on physical landmarks down below and his training in the fine art of navigation. Essentially, the pilot and navigator needed to maintain a close working partnership to get everyone to the target area and back home. If "cheek" machine guns were fitted on a Liberator model, the navigator could man one.

The dorsal turret gunner also doubled as the flight engineer and probably maintained the best defensive vantage point, offering an exceptional firing arc when compared to all other available gunner positions. The turret mounted 2 x 12.7mm machine guns. As the aircraft's in-flight mechanic, these individuals maintained a certain level of expert knowledge on the inner workings of the aircraft. His primary duty - along with defense of the upper hemisphere of the bomber - also lay in assisting the pilots on the engine condition and fuel usage.

The radioman was situated within the upper portion of the Liberator's deep fuselage, positioned just behind the cockpit and not aft of the wings as in a B-17. His positioned required him to stay hours on his headset listing for friendly communications, reporting updates to the navigator, reporting situational updates at intervals and communicating with headquarters on mission results. Radiomen were required to keep logs of all pertinent actions and could be called upon to man one of the waist guns if needed.

The forward flight crew was removed from the rear flight crew, with access between the two sections of the bomber made via a thin scaffold running the length of the two bomb compartments. Entry and exit to the aircraft was through a door positioned towards the rear which made for harrowing emergency exits. Forward crewmen were expected to exit the aircraft by walking across the bomb bay scaffold and make their way to the rear all the while fitted with their parachutes and bulky warming flight suits.

The smallest bomber personnel were generally enlisted for operation of the ball turret fitting 2 x 12.7mm heavy machine guns. These fellows wore no parachutes (the small size of the ball turret necessitated this) and made their way inside their turrets after the aircraft was in flight. The ball turret - unlike that on the B-17 - could be retracted into the Liberator's fuselage during take-off and landing. The ball turret was perhaps the coldest position on a given B-24 with many a crewmember reporting frostbite through those frigid high-altitude sorties. At any rate, the ball turret gunner held a distinct view of the action like no other crew member.

Waist gunners were charged with the defense of the Liberator's vulnerable sides through use of single 12.7mm machine guns. As such, these positions aboard Liberators suffered the most casualties by incoming fighters ready to strafe the large profile sides of the bomber. These two positions - left and right - were later staggered to compensate for each gunners firing arc. Unlike other turreted positions in the B-24, spent shell casings at these waist positions were not jettisoned from the aircraft automatically, forcing crewmembers to clear their areas themselves. Since firing from these side-perspective positions required a great deal of hand-to-eye coordination via tracer rounds while taking into account target speed and the Liberator's airspeed itself, waist gunners relied on simple targeting sights in the early years. Only later did they receive assistance in the form of compensating sights to help improve accuracy.

The tail gunner was given perhaps the most important defensive position aboard the Liberator, manning a powered 2 x 12.7mm machine gun turret. Afforded a spectacular view, the tail gunner was charged with defense of the aircraft's "six", a position most often to encounter trailing enemy fighters eager for the easy kill. One point of note here is that if the Liberator were traveling through a rain of flak bursts, the tail gunner would most often times be the safest position aboard the aircraft, with the aircraft already having flown through the exploding shell burst. It was not unheard of for aircrews to bring aboard their own personal forms of protection (plates of steel for instance) against such flak dangers.

The combat box utilized the strengths of individual Liberator firepower and crews. Gunnery crews could work together and bring to bear the power of multiple machine guns against crossing enemy fighters. Though sound in theory, the heat of battle made for something more. Coordinated gunnery was not always possible - especially between bomber crews - but communications within individual bombers were ultimately important.

The final production appearance of the Liberator fell well in line with the original Consolidated design. The wings were held high on the fuselage sides and mounted forward of the fuselage enter. The forward fuselage was stepped with a good amount of glazing while the profile of the fuselage sported broad area sides. The wings were of a long span with engines an equal distance apart. The empennage formed into the characteristic double vertical wing arrangement with rounded vertical fins. As this was America's first tricycle-equipped undercarriage bomber, the aircraft sported a nose wheel just aft of the nose cabin area and forward and under the flight deck floor. Main landing gears were situated outboard of the inner engines and sported large donut-type wheels each. Interestingly, the undercarriage system as a whole was positioned forward of the fuselage center, showcasing all its weight in the forward portions of the aircraft. While on the ground, the Liberator sported a distinctly low sitting profile which played well into the belly turret having the ability to be retracted during such actions. The bomb bay was positioned in the center of the design and divided into two compartments. The first compartment began aft of the cockpit flight deck with the second compartment ending just forward of the belly turret position.

While the B-17 Flying Fortress made heavy use of electrics, the B-24 utilized a great deal of hydraulics with such systems spanning nearly every internal inch of the aircraft. Fuel on the B-24 was situated in the wings, just inboard of the inboard set of engines as well as in the upper portion of the bomb bay. As such, any direct hit could easily set the entire aircraft on fire in seconds. This tendency was oft-remembered by many-a-Liberator-aircrew as a major drawback of the series. In contrast to the B-17 and her inherent dogged ruggedness to absorb similar punishment, the Liberator fell short in this area.

B-24 Variants

The B-24A model represented the first production runs of the Liberator. Despite any previous versions of the B-24 yet to fly, there was such a desperate need for Allied heavy bombers that the A-model was ordered regardless. Britain was included in the deliveries of these A-models under the Lend-Lease agreement and operated them under the designation of LB-30B. The A-models themselves differed slightly from the XB-24 prototype, offering up improved performance specifications due to some slight altering of aerodynamic components. Nine B-24A models became B-24C models.

B-24C models were essentially A-models but fitted with R-1830-41 series turbo-supercharged engines for increased performance. These engines also featured revised cowlings to differentiate the type further from her origins. Additionally, improvements of the this aircraft fell into the category of defense for a Martin powered turret (2 x 12.7mm machine guns) was installed to the forward portion of the fuselage and an Emerson A-6 powered turret completed the armament in the rear tail gun position.

The B-24D became the first quantitative production run of the Liberator series. These were somewhat similar in nature to the B-24C models before them but fitted improved R-1830-43 supercharged radial piston engines. Improvements to defense were made yet again, with the ventral machine gun position replaced by a remote Bendix-brand belly turret during production. This was still further improved upon with the addition of the Sperry ball turret with 2 x 12.7mm heavy machine guns and a wider firing arc. Late production D-models were given 12.7mm heavy machine guns in their "cheek" positions to protect the forward left and right side angles of the aircraft.

Ford Motor Company produced the B-24E model series, these being fitted with R-1830-65 series radial piston engines. Despite the removal of the ventral machine gun in the improved D-models, these E-models retained them over the Bendix/Sperry ball turrets. Due to the limitations in armament, these Liberators primarily served the United States Army Air Forces (USAAF) as pilot, bombardier, gunnery and crew trainers.

The XB-24F was a single prototype modified from a B-24D model and used for de-icing testing.

B-24G models were North American Aviation-produced Liberators of which 25 examples were built. These Liberators featured the Sperry ball turret and up to 3 x 12.7mm heavy machine guns in the nose for forward-based protection. The B-24G-1 was a modified G-model form sporting a new Emerson A-6 tail turret. 405 examples of this model were ultimately produced.

The B-24H was produced by Ford Motor Company to the tune of 3,100 examples with the main emphasis once again on defense of the Liberator, especially when contending with head-on attacks. As such, the fuselage was revised with a new bombardier's compartment to make room for the placement of an Emerson A-6 nose turret. This turret was nothing more than a modified version of the tail turret utilized in previous production examples. A revised tail turret greeted the tail gunner and offered up better views through larger windows. The waist gunners were now positioned in a staggered arrangement to offset their firing arcs and prevent onboard collisions of the two gunners in the heat of combat. The top turret was slightly revised with a higher canopy providing for better visibility for the gunner.

The B-24J was produced in 6,678 examples and were based on the B-24H models sans the defensive armament revisions. Nevertheless, these J-models were given a much-improved autopilot and bombsight system.

Content ©MilitaryFactory.com; No Reproduction Permitted.


The XB-24K was a proposed Liberator derivative by Ford. The idea revolved around fitting the empennage of a Douglas B-23 Dragon twin-engine bomber to the existing airframe of the Liberator. A single prototype was produced as such by converting a B-24D. Though the new aircraft flew with promise - providing for improved handling - such a project during the thick of wartime was deemed much too expensive to undertake and thusly was dropped from serious production consideration. Ford would have handled production of this new B-24N but the order was cancelled on May 31st, 1945. The XB-24K did, however, set the stage for the PB4Y-1 navalized production version of the United States Navy's Liberator fleet and ultimately led up to the definitive fully-navalized PB4Y-2 "Privateer" model.

The B-24L appeared as a result of the USAAF wanting the weight of the B-24J models reduced. Revisions to this model included the removal of the ventral ball turret and the replacement of the A-6B tail turret with a lightweight M-6A turret or no tail armament at all. The ventral gun turret was replaced by a ring-mounted system sporting 2 x 12.7mm heavy machine guns. 1,667 examples of this model were produced.

The B-24M was another attempt to lighten the B-24.This included the use of a lighter A-6B tail turret and uncovered waist gunner positions. The 2,593 M-models represented the last Liberator production models to see the light of day, with a good number never even being delivered to frontline units and instead scrapped.

The Liberator was evolved into a variety of developmental forms. These included the XB-24N with its single vertical tail fin (would have been produced as the B-24N) and the seven pre-production forms of the N-model in the YB-24N. The XB-24P was a single converted B-24D model used by the Sperry Gyroscope Company to evaluate various in-flight armaments and related systems. The XB-24Q was another single prototype examples, this time produced by General Electric, to showcase radar-controlled turrets. The XC-109/C-109 became a fuel ferry transport in support of Boeing B-24 Superfortress missions over Japan. These Liberators were fitted with special modifications to assist in prevention of onboard explosions of fuel during transport.

The XB-41 was an interesting concept to provide flights of B-24 bombers with similar Liberators armed to the teeth as floating gunship escorts. Though promising on paper, in actual practice the system proved unusable with substantial drops in performance. A single prototype was completed for evaluation and sported no less than 14 x 12.7mm Browning M2 machine guns. Instead of a bombload, the bomb bay was fitted with up to 11,000 rounds of 12.7mm ammunition. Power was derived from 4 x Pratt & Whitney R-1830-43 Twin Wasp radial piston engines of 1,250 horsepower. When evaluated in-flight as escorts alongside the base Liberator bomber, this particular Liberator was unable to keep pace while the aircraft also propagated stability issues and, as such, the proposition for such a machine was ultimately axed in 1943.

The Liberator airframe was utilized for training of various flight crew. These were known by the designations of AT-22 (TB-24), RB-24L, TB-24L and C-87. The RB-24L deserves note here for they were utilized to train Boeing B-29 gunnery crews on remote gun systems as found on the B-24L. The TB-24L was similar to the RB-24L with an increase to radar equipment carried aboard. Base C-87s were used for the training of future Liberator engineers.

The C-87 "Liberator Express" was a 20-passenger transport and appeared in A- (16-passenger VIP transports with R-1830-45 radial engines and sleeping berths), B- (proposed armed passenger transport), and C-models (RY-3 of the USAAF).

Photographic reconnaissance versions of the Liberator were in no short supply. The XF-7 represented the prototype based on the B-24D model. The F-7 was the initial reconnaissance platform developed from the B-24H. The B-24J was the basis of the F-7A while the F-7B was of a similar mold, though sporting up to six cameras in the bomb bay as opposed to the previous type's three.

The BQ-8 were converted B-24D and B-24J models at the end of their useful operational lives, outfitted to serve as radio-controlled flying bombs.

Liberators for the US Navy

The Liberator served with the United States Navy in a handful of varied forms. These became the PB4Y-1 (based on the B-24D) and sported the previous type's twin vertical finned tail. PB4Y-1 also served to cover all future G-, J-, L- and M-models of the Liberator in USN service. The PB4Y-P became a photographic reconnaissance variant based on the PB4Y-1. The P5Y was a proposed twin-engine version of the PB4Y-1 but never produced. The C-87 transport version became the RY-1 (C-87A), the RY-2 (C-87 base) and the RY-3 (a dedicated transport alternative of the PB4Y-2 "Privateer").

The PB4Y-2 "Privateer" was a truer "navalized" and dedicated form of the Liberator and based on Ford's B-24K idea which fitted the tail section of a Douglas B-32 Dragon and its single vertical tail fin for improved stability. The USN made good on 739 examples of this type of which served on even into the Korean War, ultimately retired in 1954.

British Liberators

As mentioned above, the United Kingdom made use of the Liberator in their various air campaigns of World War 2. As always, they saw fit to re-designate the received American systems to follow a more "British" nomenclature. Early Liberators were the LB-30A and LB-30B models of which very few were constructed and delivered, these via Lend-Lease. LB-30A's were originally intended for French use and fell into British hands in six examples with the fall of France. The Liberator B.Mk I's (LB-30B) were B-24A's of which 20 were delivered to the Royal Air Force. These were eventual initial disappointments for the RAF which saw fit to give them new life as Liberator GR.1s used in anti-submarine sorties.

The Liberator B.Mk II was next and were closest in nature to B-24C models. These Liberators had their fuselages extended by three feet with a revised deeper fuselage and expanded tail plane unit. 165 examples of these Liberators were produced and became the first "combat-worthy" British Liberators. British Prime Minister Winston Churchill used a refurbished Liberator II as his personal transport.

The Liberator B.Mk III were based on B-24D models fitting appropriate British-requested internal systems. Defense was handled by a single machine gun in the nose (.303 caliber), a twin-gun dorsal turret, two waist gun positions and a 4 x machine gun battery located in an Avro Lancaster-type tail turret. At least 156 of the type were delivered. The Liberator B.Mk IIIAs were nothing more than B-24D models retaining their American-based equipment and armament.

The Liberator B.Mk V were D-models revised to carry more fuel with less armor while retaining the defensive armament capabilities of the Liberator B.Mk III models. The Liberator B.Mk VI were B-24H models with the defensive armament of H-models but Boulton Paul tail turrets. B-24J models were represented as Liberator B.Mk VIIIs.

RAF Coastal Command modified several B-24D models for the anti-submarine role complete with the Leigh Light 22-million candela search light (carried underwing), search radar and air-to-surface rockets. Coastal Command also made use of the Liberator GR.Mk VI (B-24G/H/J models) as long-range reconnaissance forms and B-24J models under the Liberator GR.Mk VIII designation for the anti-submarine role.

The Liberator C.Mk IV were B.Mk VIII models modified to serve as transports while Liberator C.Mk VII was the designation used to cover C-87s. Liberator C.Mk VIII models were nothing more than G.Mk VIII modified to be used as transports.

The Royal Air Force designated their RY-3/C-87Cs as Liberator C.Mk IX.

Operational Liberators

Like most other early-war American-designed implements, the Liberator saw first combat action with British air forces. First operational B-24's became the Liberator GR.I (RAF Coastal Command) with the first use of Liberators becoming Liberator B.Mk I's utilized as pilot ferry transports starting in March of 1941. This was followed into service by the improved B.Mk IIs in late 1941. The following year saw first use of the system as a bomber with missions encompassing the Middle East Theater.

The Americans also received their first (B-24A models) Liberators in 1941. Like the British, the aircraft was not used as a bomber until 1942, utilized in the interim instead as a transport. As the war developed, the B-24 became a star player in all major theaters of war, bombing logistical targets in Europe and Asia while containing naval operations in the Pacific and the Atlantic. The Liberator's reach touched North Africa as well and proved a better long-range component to the Allied war effort than the fabled B-17 Flying Fortresses. As the war progressed, the Liberator was evolving into a critical facet of all Allied actions. Though previous models proved serviceable enough, the series was solidified with the definitive B-24H. In the end, production of Liberators was so substantial (a reported 18,482 were produced) that production was handled not only by Consolidated and Ford but also by North American and Douglas. As one can surmise, the birth places of these Liberator groups inevitably led to inherent differences in each aircraft complicating their repairs once out in the field. As such, airfields were forced to carry differing components for which to repair these aircraft and keep them flying.

Like the B-17 before it, the B-24 proved critical for the US 8th Air Force and its bombing raids across German-held strongholds. Attacks initially emanated from bases within England but territorial gains by the Allies opened up points of origin from North Africa and Italy with the 9th and 15th Air Forces. Before long, the Third Reich could be assaulted from every which direction and their logistical infrastructure collapsed with each passing month. The first B-24 was lost to combat on February 26th, 1943.

Perhaps the best remembered B-24 sortie in Europe encompassed no fewer than 178 B-24 Liberators (other sources state 177) charged with the destruction of the nine Ploiesti oil refineries in Romania on August 1, 1943. The sortie was characterized under the title of "Operation Tidal Wave" and was afforded the goal of destroying the Romanian fields oil production in half a year. Oil was (and still is) an important component to any army worth their weight and the Allies and Axis both knew the price of losing such a vital asset. Allied forces were already battling Axis powers in Sicily at this time and the Axis losing Ploesti - an area fulfilling an estimated 60% of Germany's oil needs- would have been a decisive blow.

The attack consisted of the 98th and 376th Bombardment Group of the 9th Air Force along with the 44th, 93rd and 389th Bombardment Groups of the 8th Air Force emerging from their air base in Libya. Bomb and fuel laden aircraft took off on the morning of August 1st, 1943 (already 9 Liberators were lost in take-off accidents) and began their 1,000 mile long journey deep into enemy territory. Heavy cloud coverage over Bulgaria immediately posed a visibility threat, forcing wide separations in the B-24 flight group. Radio silence was also the order of the day and any Liberator found without his formation was essentially on his own. Separation of entire bombing groups forced the attack to commence in staggered waves, giving the prepared Axis ground defenses time to adjust and further prepare for the ensuing waves. The B-24 flights arrived flying at tree-top altitude and expected by their enemy foes.

Fifty-three aircraft (some sources state 54) were lost in the ensuing action totaling 660 airmen (some sources stating 532) in all (440 KIA and 220 POW from a total of 1,726 airmen were ultimately involved). Despite their valiant efforts, the German air defense - made up of hundreds of coordinated anti-aircraft artillery guns in the area along with on-call air support from fighters with German surveillance "eyes and ears" already on alert as early as Athens, Greece - proved fatal and the end result was devastating for all involved. Confusion on the part of the Allied aircrews added insult to injury and bombardiers attacked target areas through smoke caused by attacks that had already commenced by other bombers earlier in the assault. Late exploding ordnance on the ground also wreaked havoc on passing Liberators in the air. Essentially, the oil refineries - though largely hit - remained largely in production after the assault and those that were damaged were back in business in a few short weeks. The raid, even to this day, remains one of the more costly US Air Force sorties. Medal of Honor Recipients for actions committed in the Ploesti assault mission were Colonel Leon W. Johnson, Colonel John R. Kane, Lieutenant Colonel Addison E. Baker, Major John L. Jerstad and 2nd Lieutenant Lloyd H. Hughes.

Most often times overlooked was the contribution of the B-24 in the Atlantic Theater in combating Hitler's lethal U-boat herd. The Liberator proved sound for the role thanks to its well low-flying capabilities and - more importantly - extended range. The range of these aircraft finally allowed air protection for the Allied Atlantic convoys deep in the target area for the first time in the war. Liberators charged as such were fitted with bombs and specialized ASV Mark II radar systems and could operate in both day and night with effectiveness. As submarines of the time had to surface to periscope depth to fire their torpedoes, the bird's eye view provided by these Liberators proved a God-send to all Allied sea-going vessels. By the end of their actions in the Atlantic, Liberator crews were credited with no fewer than 72 confirmed U-boat kills.

Even more "under the radar" for the Liberator's long and illustrious history was its use in secret missions all across Europe. The B-24D model served this purpose and was modified for the role to serve both American and British interests. Missions included supplying Allied-friendly "underground" forces and Allied forces in need of fuel and supplies, dropping off spies and commando parties and recovering escaped Allied prisoners of war. These seemingly small contributions paid exceedingly large dividends for major events of the war including the D-Day invasion and Patton's famous race to Berlin in which he often times out-distanced his fuel supplies.

B-24 Liberators operating in the Pacific enjoyed a better return on investment in thanks to the aircraft's inherent long range capability surpassing that of the B-17. Not facing the dogged anti-aircraft defenses of Hitler's Germany or squaring off daily against a hornet's nest of German fighters, these aircraft achieved better results with the different demands imposed on them. In contrast to their European presence, where General Doolittle refused to take on more B-24's in favor of B-17's for the 8th Air Force, these Pacific titans assisted in returning control of the various collection of Pacific islands back to Allied hands. British Liberators made many-a-bombing run against Japanese forces in Burma from Allied bases in India.

Operators

To go along with American and British use of the Liberator, other operators included Australia, Brazil, Canada, China (Taiwan), Czechoslovakia, Nazi Germany, India, Italy, Netherlands, New Zealand, Poland, Portugal, Soviet Union (via Lend-Lease), South Africa and Turkey.

Miscellaneous

Today, only three B-24 Liberators are air-worthy with several on display as museum pieces throughout the world. A B-24D is on display at the United States Air Force Museum in Dayton, Ohio, USA. Hollywood actor Jimmy Stewart flew at least 20 sorties as pilot in a B-24 Liberator.

Throughout its operational life, the B-24 earned such nicknames as "The Flying Boxcar" for its slab-sided broad fuselage surface area and "The Flying Coffin" for its only method of entry/exit being located to the rear of the craft. At one time during its tenure, the Liberator was one of the heaviest aircraft ever produced.

Conclusion

In the end, the B-24 found a rightful place in the vast history that became World War 2. When compared to the B-17, it lacked in overall stability, fuel efficiency, service ceiling and bomb load. Where it did best its friendly rival was in range and sheer numbers. Despite the limitations, the Liberator made a name for itself throughout the world and truly became part of the "liberating" presence encountered in Europe, the Pacific, Asia, the Mediterranean and the Atlantic.

The B-24 was officially retired as soon as the war ended - this occurring in 1945. A single Liberator unit cost American taxpayers between $297,627 and $336,000 US at the time of her production. Production years ranged from 1940 until 1945.

"Lady Be Good"

One particular B-24D, "Lady be Good" was of note. The aircraft, part of a 25-strong flight of similar Liberators of the 376th Bomb Group, took off from Soluch, Libya to attack a target in Naples, Italy on the afternoon of April 4th, 1943. Of the 25 aircraft, all but Lady Be Good returned home, mysteriously vanishing without incident. It wasn't until November 9th, 1958 - some 16 years later - that the lady was found in the Libyan desert 400 miles south of Soluch with no trace of her crew. Positive identification of the aircraft occurred in March of 1959 and it was deemed that the crew had lost its way in the dark of night. The crew bailed out as their Liberator ran out of fuel and attempted to foot it across the sun-baked Libyan desert. It was not until 1960 that any remains of the crewmembers were located, one as far as 109 miles from the crash while at least five were within 80 miles. it was surmised that the crew lived a full eight days with little water, if any. Parts of the wreckage were later sent back to the United States for further study and later reused as repair spares on other aircraft. In a bizarre series of seemingly inexplicable incidents, many of these aircraft later crashed just as mysteriously as the Lady Be Good.

Voices of the War

B-24 Liberator veteran Jack B. responded to us via email. He began his career in the B-24 and graduated to a B-17. This was his recollection of his B-24 days:

"My own memory (involving about 65 years) of B-24s is the smell of hydraulic fluid and of 100 octane fuel. The 24s used hydraulics for nearly everything in contrast to "17s", which relied on electricity and small collections of electrical lines. The hydraulic lines were everywhere in "24s" and they leaked. You can imagine the mess when even one line was struck by flak or bullets. The 24s had a bunch of smaller fuel tanks spread between the inboard engines, even in the top of the bomb bays. and those connections leaked as well. The smell of gasoline doesn't contribute much to one's feeling of well-being."

Content ©MilitaryFactory.com; No Reproduction Permitted.
Operators
Global customers who have evaluated and/or operated the Consolidated B-24 Liberator. Nations are displayed by flag, each linked to their respective national aircraft listing.

Total Production: 18,482 Units

Contractor(s): Consolidated Aircraft / Ford Motor Company / Douglas Aircraft / North American Aviation - USA
National flag of Australia National flag of Brazil National flag of Canada National flag of Czechia National flag of modern Germany National flag of Nazi Germany National flag of India National flag of Italy National flag of the Kingdom of Italy National flag of the Netherlands National flag of New Zealand National flag of Poland National flag of Portugal National flag of South Africa National flag of the Soviet Union National flag of Taiwan National flag of Turkey National flag of the United Kingdom National flag of the United States

[ Australia; Brazil; Canada; Taiwan; Czechoslovakia; Nazi Germany; India; Kingdom of Italy; Netherlands; New Zealand; Poland; Portugal; Soviet Union; South Africa; Turkey; United Kingdom; United States ]
1 / 10
Image of the Consolidated B-24 Liberator
Image copyright www.MilitaryFactory.com; No Reproduction Permitted.
2 / 10
Image of the Consolidated B-24 Liberator
Image copyright www.MilitaryFactory.com; No Reproduction Permitted.
3 / 10
Image of the Consolidated B-24 Liberator
Image copyright www.MilitaryFactory.com; No Reproduction Permitted.
4 / 10
Image of the Consolidated B-24 Liberator
Image copyright www.MilitaryFactory.com; No Reproduction Permitted.
5 / 10
Image of the Consolidated B-24 Liberator
Image copyright www.MilitaryFactory.com; No Reproduction Permitted.
6 / 10
Image of the Consolidated B-24 Liberator
Image copyright www.MilitaryFactory.com; No Reproduction Permitted.
7 / 10
Image of the Consolidated B-24 Liberator
Image copyright www.MilitaryFactory.com; No Reproduction Permitted.
8 / 10
Image of the Consolidated B-24 Liberator
Image copyright www.MilitaryFactory.com; No Reproduction Permitted.
9 / 10
Image of the Consolidated B-24 Liberator
Image copyright www.MilitaryFactory.com; No Reproduction Permitted.
10 / 10
Image of the Consolidated B-24 Liberator
Image copyright www.MilitaryFactory.com; No Reproduction Permitted.

Similar
Developments of similar form-and-function, or related, to the Consolidated B-24 Liberator Four-Engined Strategic Heavy Bomber Aircraft Specifications and Pictures.
Going Further...
The Consolidated B-24 Liberator Four-Engined Strategic Heavy Bomber Aircraft appears in the following collections:
HOME
AVIATION INDEX
AIRCRAFT BY COUNTRY
AIRCRAFT MANUFACTURERS
COMPARE AIRCRAFT
AIRCRAFT BY CONFLICT
AIRCRAFT BY TYPE
AIRCRAFT BY DECADE
BERLIN AIRLIFT AIRCRAFT
COLD WAR AIRCRAFT
WWII AIRCRAFT
Disclaimer | Privacy Policy | Cookies

2024 Military Pay Scale Military Ranks of the World U.S. Department of Defense Dictionary Conversion Calculators Military Alphabet Code Military Map Symbols Breakdown U.S. 5-Star Generals List WWII Weapons by Country World War Next

The "Military Factory" name and MilitaryFactory.com logo are registered ® U.S. trademarks protected by all applicable domestic and international intellectual property laws. All written content, illustrations, and photography are unique to this website (unless where indicated) and not for reuse/reproduction in any form. Material presented throughout this website is for historical and entertainment value only and should not to be construed as usable for hardware restoration, maintenance, or general operation. We do not sell any of the items showcased on this site. Please direct all other inquiries to militaryfactory AT gmail.com. No A.I. was used in the generation of this content.

Part of a network of sites that includes GlobalFirepower, a data-driven property used in ranking the top military powers of the world, WDMMA.org (World Directory of Modern Military Aircraft), WDMMW.org (World Directory of Modern Military Warships), SR71blackbird.org, detailing the history of the world's most iconic spyplane, and MilitaryRibbons.info, cataloguing military medals and ribbons. Special Interest: RailRoad Junction, the locomotive encyclopedia.


©2024 www.MilitaryFactory.com • All Rights Reserved • Content ©2003-2024 (21yrs)